

스레드(Thread) : 동시 수행이 가능한 작업 단위 (보통 한개의 프로세스는 하나의 일만 하지만 스레드를 이용하면 2가지 이상이 가능해짐)
대기시간이 길어지는 기능(ex.네트워크 요청)을 수행할 때 UI가 멈춤상태로 있게 되는 문제 발생.
👉멀티스레드 방식을 사용해서 해결. (같은 프로세스 안에 들어있으면서 메모리 리소스를 공유하므로 효율적임)
그런데 스레드는 화면 레이아웃에 들어있는 뷰들에 접근하지 못함.
(메인 스레드와 또 다른 스레드가 공통 메모리 리소스에 동시에 접근할 시 문제가 발생하기 때문)
동시에 리소스에 접근할 때 데드락(DeadLock)이 발생하여 시스템이 비정상적으로 동작할 수 있다.
*메인 스레드 : UI를 관리하는 기본 스레드
*데드락(DeadLock) : 어떤 것을 먼저 처리할 지 판단할 수 없어🤷 발생하는 시스템 상의 문제
👉그래서 핸들러(Handler)를 이용해서 순서대로 처리해야함.
(메인 스레드에서 이미 UI에 접근하고 있으므로, 새로 생성한 다른 스레드에서 핸들러 객체를 사용하여 전달하면 메인 스레드에서 처리할 수 있다.)
🔥주요 메서드
- obtainMessage : 메시지 객체 설정 (Message message = handler.obtainMessage();)
- sendMessage : 핸들러로 메시지 객체 보내기 (handler.sendMessage(message);)
- handleMessage : 핸들러 수행 시 이 메서드에 정의된 기능이 수행됨. (핸들러를 상속받은 새 핸들러 클래스에서 재정의해서 기능을 추가할 수 있다.)
이 순서로 메시지 객체가 전달된다.
📖 예제 목차 📖
<스레드&핸들러로 메시지 전송하기 : MainHandler 클래스 만들기>
<더 간단한 방법 : Runnable 객체 실행하기>
<스레드&핸들러로 메시지 전송하기 : MainHandler 클래스 만들기>
1️⃣activity_main.xml
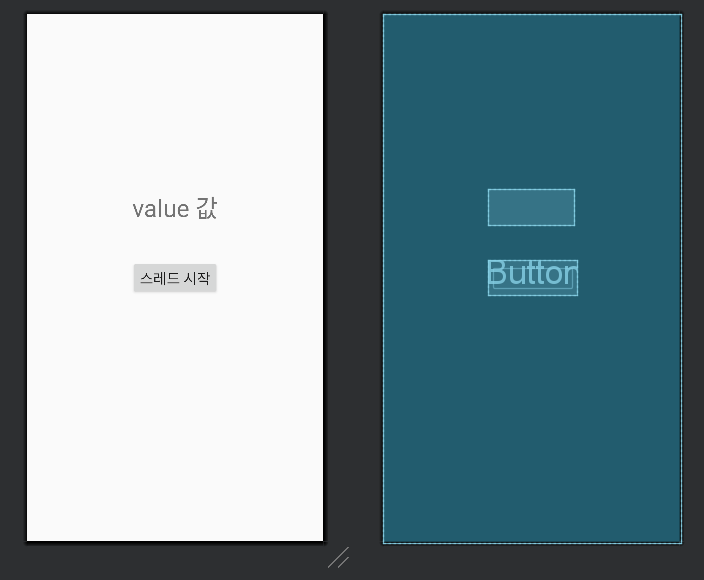
2️⃣MainActivity.java
🔸전체코드🔸
package com.example.chapter9_1;

public class MainActivity extends AppCompatActivity {
    TextView textView;
    MainHandler handler;

    @Override
    protected void onCreate(Bundle savedInstanceState) {
        super.onCreate(savedInstanceState);
        setContentView(R.layout.activity_main);

        handler = new MainHandler(); // 핸들러 객체 만들기

        textView = findViewById(R.id.textView);
        Button button = findViewById(R.id.button);
        button.setOnClickListener(new View.OnClickListener() {
            @Override
            public void onClick(View view) {
                BackGroundThread thread = new BackGroundThread();
                thread.start(); // 스레드 객체 생성 후 실행
            }
        });

    }

    // 스레드를 실행하면 그 안에 들어있는 run 메서드가 실행된다.
    class BackGroundThread extends Thread{
        int value = 0;

        public void run(){
            for(int i=0;i<100;i++) {
                try {
                    Thread.sleep(1000); // 지정된 시간(1초) 동안 스레드 일시중지
                } catch (Exception e) {
                }
                // try-catch 문 : 예외상황(Exception)이 발생할 시 실행.

                value += 1; // 1초마다 value 값이 1씩 상승
                Log.d("Thread", "value : " + value); // 1초마다 value 값 출력

                Message message = handler.obtainMessage();
                // Message 객체에는 Bundle 객체가 들어있어서 put@@@ 메서드와 get@@@ 메서드로 데이터 이동이 가능하다.
                Bundle bundle = new Bundle();
                bundle.putInt("value", value);
                message.setData(bundle);

                handler.sendMessage(message); // 메시지 큐에 넣은 message는 순서대로 핸들러가 처리하게 된다.
            }
        }
    }

    // 핸들러의 handlerMessage 메서드에 정의된 기능이 수행돤다.
    class MainHandler extends Handler {
        @Override
        public void handleMessage(@NonNull Message msg) {
            super.handleMessage(msg);

            Bundle bundle = msg.getData();
            int value = bundle.getInt("value");
            textView.setText("value 값 : "+value);
        }
    }
}
🔹onCreate🔹
    @Override
    protected void onCreate(Bundle savedInstanceState) {
        super.onCreate(savedInstanceState);
        setContentView(R.layout.activity_main);

        handler = new MainHandler(); // 핸들러 객체 만들기

        textView = findViewById(R.id.textView);
        Button button = findViewById(R.id.button);
        button.setOnClickListener(new View.OnClickListener() {
            @Override
            public void onClick(View view) {
                BackGroundThread thread = new BackGroundThread();
                thread.start(); // 스레드 객체 생성 후 실행
            }
        });
    }
버튼을 누르면 BackGroundThread 객체를 만든다.
🔹BackGroundThread🔹
Thread를 상속받는 새 클래스를 만들어준다.
스레드를 실행하면 run 메서드가 실행되므로, run 메서드 내에 코드를 작성해주자. (❓근데 왜 run은 재정의하지 않는거지?)
    class BackGroundThread extends Thread{
        int value = 0;

        public void run(){
            for(int i=0;i<100;i++) {
                try {
                    Thread.sleep(1000); // 지정된 시간(1초) 동안 스레드 일시중지
                } catch (Exception e) {
                }
                // try-catch 문 : 예외상황(Exception)이 발생할 시 실행.

                value += 1; // 1초마다 value 값이 1씩 상승
                Log.d("Thread", "value : " + value); // 1초마다 value 값 출력

                Message message = handler.obtainMessage();
                // Message 객체에는 Bundle 객체가 들어있어서 put@@@ 메서드와 get@@@ 메서드로 데이터 이동이 가능하다.
                Bundle bundle = new Bundle();
                bundle.putInt("value", value);
                message.setData(bundle);

                handler.sendMessage(message); // 메시지 큐에 넣은 message는 순서대로 핸들러가 처리하게 된다.
            }
        }
    }
0~100초 동안 매초마다 value 값을 logcat에 출력하고, 메인액티비티의 textView에다가도 넣어줄 수 있도록
핸들러를 사용한다. obtainMessage와 sendMessage 메서드를 사용함
참고한 블로그
🔹MainHandler🔹
Handler를 상속받은 MainHandler 클래스를 만들어준다. (MainHandler 객체 사용)
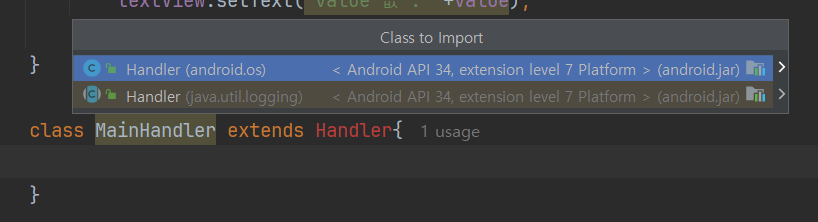
참고로 Handler는 android.os 패키지에 들어있는 클래스를 사용하면 된다.
    // 핸들러의 handleMessage 메서드에 정의된 기능이 수행돤다.
    class MainHandler extends Handler {
        @Override
        public void handleMessage(@NonNull Message msg) {
            super.handleMessage(msg);

            Bundle bundle = msg.getData();
            int value = bundle.getInt("value");
            textView.setText("value 값 : "+value);
        }
    }
handleMessage 메서드를 재정의한 다음 Bundle 객체에 받아온 데이터를 넣어준 뒤,
그 객체에다가 key값인 "value"를 사용하여 가져온 값을 텍스트뷰에 지정해준다.
3️⃣실행결과
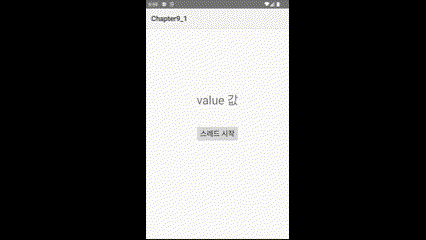
'스레드 시작' 버튼을 누르면 텍스트가 초마다 변경되는 것을 볼 수 있다.
<더 간단한 방법 : Runnable 객체 실행하기>
🆙MainActivity.java 수정하기
MainHandler 클래스를 제거하고 기본 Handler 객체를 생성한다.
package com.example.chapter9_1_1;

public class MainActivity extends AppCompatActivity {
    TextView textView;
    Handler handler = new Handler(); // API의 기본 핸들러 객체 생성

    @Override
    protected void onCreate(Bundle savedInstanceState) {
        super.onCreate(savedInstanceState);
        setContentView(R.layout.activity_main);

        textView = findViewById(R.id.textView);
        Button button = findViewById(R.id.button);
        button.setOnClickListener(new View.OnClickListener() {
            @Override
            public void onClick(View view) {
                BackgroundThread thread = new BackgroundThread();
                thread.start();
            }
        });
    }

    class BackgroundThread extends Thread{
        int value = 0;

        public void run(){
            for(int i=0;i<100;i++){
                try{
                    Thread.sleep(1000);
                }catch (Exception e){}

                value+=1;
                Log.d("Thread","value : "+value);

                // post 메서드 사용 (Runnable 객체를 만들어준다.)
                // 이러면 결과를 텍스트뷰에 표시할 수 있다.
                handler.post(new Runnable() {
                    @Override
                    public void run() {
                        textView.setText("value 값 : "+value);
                    }
                });
            }
        }
    }
}
Handler 객체를 만들어 변수에 할당해두면 이 객체의 post 메서드를 호출할 수 있다.
코드가 위에서 작성한 것보다 훨씬 간단해졌다. 굳
실행 결과는 위 예제랑 동일하다.
+ runOnUiThread 메서드⭐
이 메서드를 사용하면 핸들러 객체를 만들지 않고도 메인 스레드에서 동작하게 만들 수 있다.
'TIL > 안드로이드 스튜디오' 카테고리의 다른 글
| 9장 - 스레드로 애니메이션 만들기 (0) | 2025.01.24 |
|---|---|
| 9장 - 일정 시간 후에 실행하기 (0) | 2025.01.24 |
| 도전!16 - 웹브라우저 화면 구성 (0) | 2025.01.21 |
| 도전!15 - 입력 화면의 애니메이션 (0) | 2025.01.21 |
| 8장 - 웹뷰, 시크바, 키패드 제어 (0) | 2025.01.20 |